

This was my first time trying this, and I had a blast, and think I will be doing it alot more.
What you will need:

*Resin (I use Castin Craft Clear Resin). You can find this at any major chain craft store.
*Catalist (I use Castin Craft Catalist)
*Something to mix it in, I found that 3 oz unwaxed Dixie Cups work great for this - they are disposable, and flexible. I'll tell you now, disposable is good, because your resin will dry fast, and it's nice to be able to just toss the cups once this happens.
*Something to mix the resin and catalist, like a popsicle stick. As I have no popsicle sticks, I found using the wrong end of a paintbrush works just as well!
*Bottle Caps
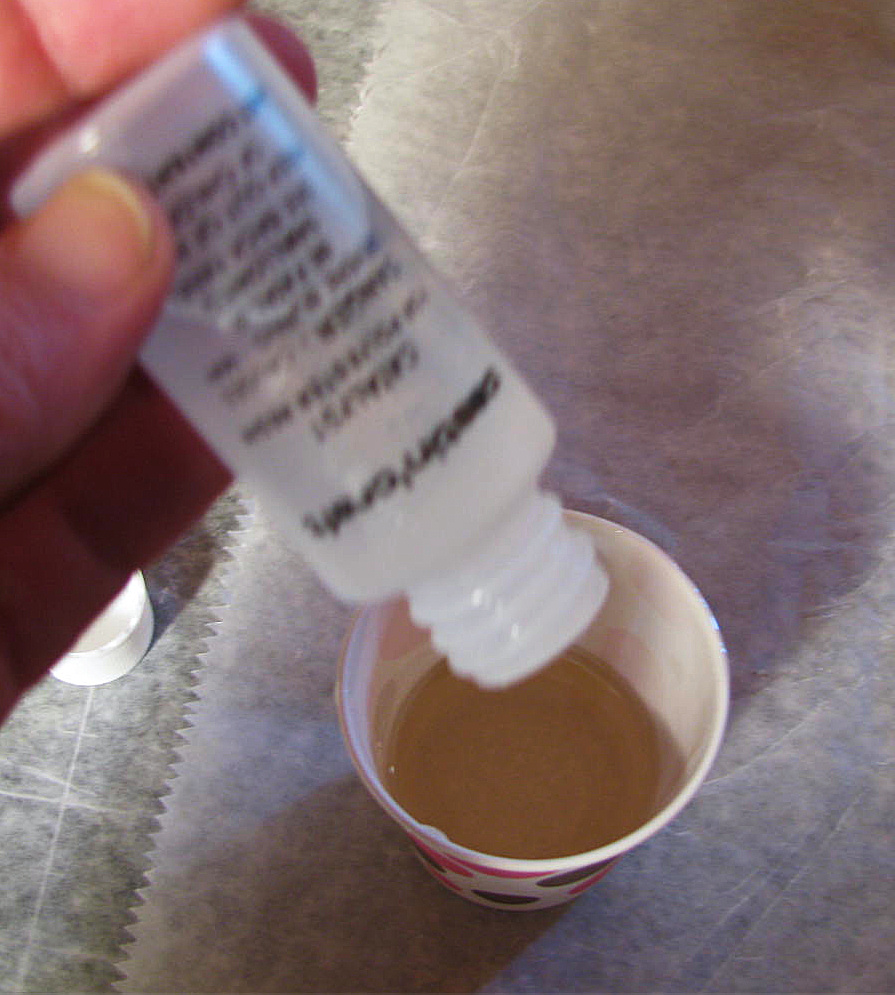
Fill your 3 oz paper cup about a third of the way up with resin, so you have approximately 1 of resin in the cup. Next, add 15 drops of catalist to the resin and stir for about a minute.
Your resin is ready to use! Depending on what you'd like to do with your bottle cap, the steps are different, with endless possibilities.
If you simply want a nice background, cut a circle from the patterned paper of your choice about the size of the inside of the bottle cap. I used a piece of Graphic 45 paper for this one, and just cut a rough circle around the area I wanted to use. Place the circle, face up, inside the bottle cap and cover with a layer of resin. You are done, all you have to do now is follow the resin manufacturer's instructions for allowing the proper time to harden and dry.

If you want some color in your background, it's very easy! I am sure there are many different ways to get color, using the products of your choice, but the way I did it, which was very easy, was to pour a thin layer of resin into the bottle cap, allow it to begin to harden for about 15 minutes, and then I just dropped a few drops of Alcohol Ink over that. Remember, you only want a thin layer of resin, you want to be able to add some embellishments, and you will need room!


Now, depending on the effect you want, you can allow the ink to dry before adding embellishments, for a solid background, or you can add the embellishments immediately for a bleeding effect. You can see the difference in the end result in this picture:

The fun part is adding the embellishments. If you plan to add embellishments, please remember that is important that your first layer of resin is THIN, so that the embellishments and another layer of resin will fit in the cap.
The possibilities with embellishments is endless! Simply add whatever you want over the first layer of resin. But you must allow the bottom layer of resin to harden to a thick gel consistancy before adding embellishiments, or they will just sink to the bottom of the cap.

Once you have arranged the embellishments to your liking, pour enough of the remaining resin from your cup over them, so that they are covered completely. Allow to dry according to the resin manufacturer's instructions, and you have a fun and unique embellishment to add to your layouts!

I hope you have fun with this technique, I sure did!
Awesome technique! You know I love the red one with the heart and the key!
ReplyDeleteThese are really neat Mel!! Thank you for sharing this. Now I need those supplies!!! LOL!!
ReplyDeleteThis comment has been removed by the author.
ReplyDeleteI loved this tute...not sure I can get the stuff you used but THANKS to you :) I have used the inspiration for my LO here: http://mazzarati.blogspot.com/2010/11/growing-up-baby-born.html I simply filled up my bottlecap with Dimensional Magic and added the wee embellies then waited for about 12 hours to dry - enjoy the close-ups too!! & TFL
ReplyDeleteOMG! this is really amazing! Will definitely have to try my hand at this!!!
ReplyDeleteI was happy to learn the proper technique for adding embellishments.
ReplyDelete